Are you new to Windows 11? Don't like the context menu in File Explorer. You can easily get the old menu back by following this tutorial.
Why would you need to do this? Well, File Explorer is not fast at all when it comes to opening files, here's a way to fix it. Anyway, the right-click menu in Windows 11 can cause further delays, as it does not display all the available options on the first click. You have to click “Show more options” to see the good old context menu. This can be annoying if you work with a lot of files, and want to access additional options to open files or perform actions through other apps.
You can bypass this menu by holding down the Shift key while right-clicking, but this is inconvenient (compared to restoring the old menu) and you might forget to do so.

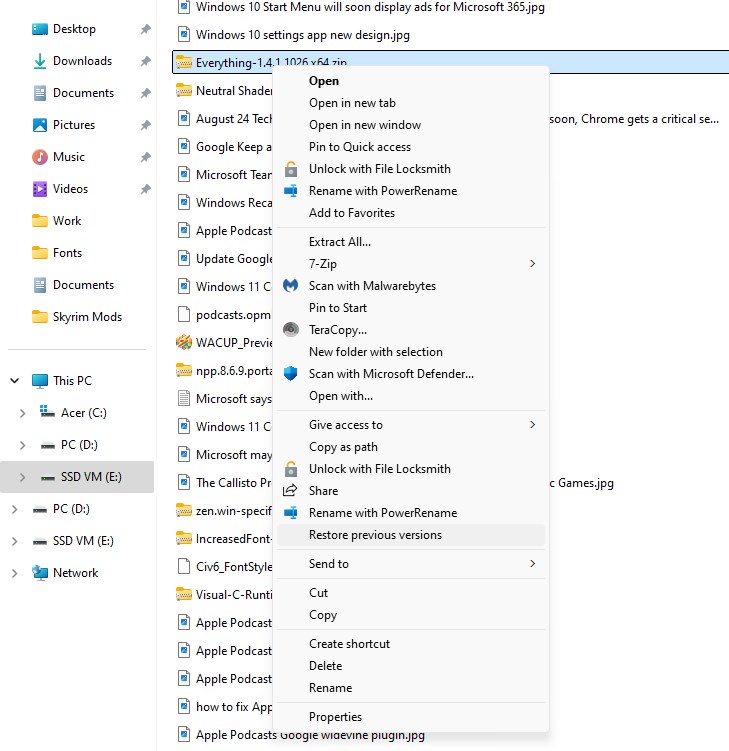
Take this screenshot for example, I wanted to open an archive in 7-Zip, but I had to go through 2 menus. Let's fix this problem.
How to enable the old context menu in File Explorer in Windows 11
1. Open the Windows Registry Editor. You can do this by pressing Win + R, and entering “regedit” without the quotation marks and then pressing Enter. Or, you can search for Registry Editor in the Start Menu, and open it.
2. Go to the following location in the Registry Editor by pasting it in the address bar.
ComputerHKEY_CURRENT_USERSOFTWARECLASSESCLSID

3. Select the above location, and then right-click inside the pane on the right, and select “New > Key”.
4. Name it like this:
{86ca1aa0-34aa-4e8b-a509-50c905bae2a2}
Note: You need to include the parentheses (curly braces).
5. Select the newly created key, and again right-click in the right pane, and select New > Key. Rename it to “InprocServer32”. (Don’t include the quotation marks this time). The data of the key will be in the form of “Value not set”. To delete it, simply open it, and close it to reset its value to blank (see screenshot below).

6. Now, restart your computer. Or, just open Task Manager and right-click on Windows Explorer. Select Restart. Open File Explorer and right-click anywhere, and it should display the old context menu.
If you want to undo the change, delete the key created in step 5, and you will get the new menu back.
Beginner-friendly version
“No, I’m not very good with computers, it’s too complicated for me, I don’t want to mess with the registry editor.” If you think the same, don’t worry, here is a simple way to disable the new context menu in File Explorer.
I have created both the registry files and uploaded them, so you can download them without having to recreate the files manually. Just download the following zip archive and extract it to get the files: Windows 11 Classic Context Menu Registry
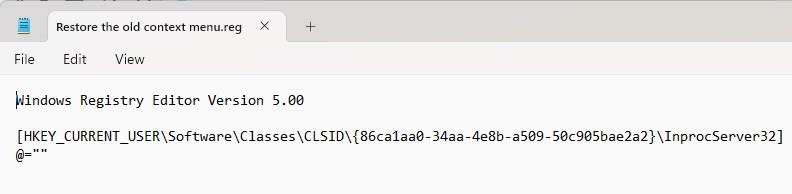
1. Open Notepad and paste the following code into it.
Windows Registry Editor version 5.00
[HKEY_CURRENT_USERSoftwareClassesCLSID{86ca1aa0-34aa-4e8b-a509-50c905bae2a2}InprocServer32]
,
2. Save the document as a file ending in .reg. For example: Restore Old Context Menu.reg
3. Now open the file, and the User Account Control (UAC) will ask you if you want the Registry Editor to make changes to it. Just click Allow.
4. And in the next pop-up, click Yes. This will automatically create the registry key for you.
Reboot the computer to apply the changes, or restart Windows Explorer from Task Manager.
To enable the new menu, save the following code in a reg file, and name it something like this: Enable the new context menu.reg
Windows Registry Editor version 5.00
[-HKEY_CURRENT_USERSoftwareClassesCLSID{86ca1aa0-34aa-4e8b-a509-50c905bae2a2}],
Run it, reboot the system or restart Explorer. That's it, now you can access the context menu of your choice.
Thanks for reading..